MISP is becoming a popular open source option for managing threat intelligence at the operational level by sharing indicators of compromise (IOCs) and contextualizing them with other data. It can, however, be a bit daunting to figure out how to use the event filters. In this post I’ll go through the different filters and how they work, and hopefully provide some examples that you can use in your own environment.
Table of contents
- Let’s get hunting
- Event filtering basics
- Default MISP2Sentinel filters
- Some honorable mentions
- Putting it all together
- Closing remarks
Let’s get hunting
With the new Upload Indicators API coming out, the misp2sentinel-project being updated to use this new API and provided as a solution in Content Hub, I thought it would be a good time to write a bit about how event filters work in MISP and hopefully help some people hunting for threats in their environments.

Event filtering basics
The first thing we need to know about MISP event filters is that they are an implementation of parameters used to search the MISP API. A similar list of parameters can be found in the PyMISP documentation. MISP allows for exporting events in the STIX format, which is also what the new upload indicators API accepts. The image below shows the workflow of the MISP2Sentinel project and where the event filters are used.
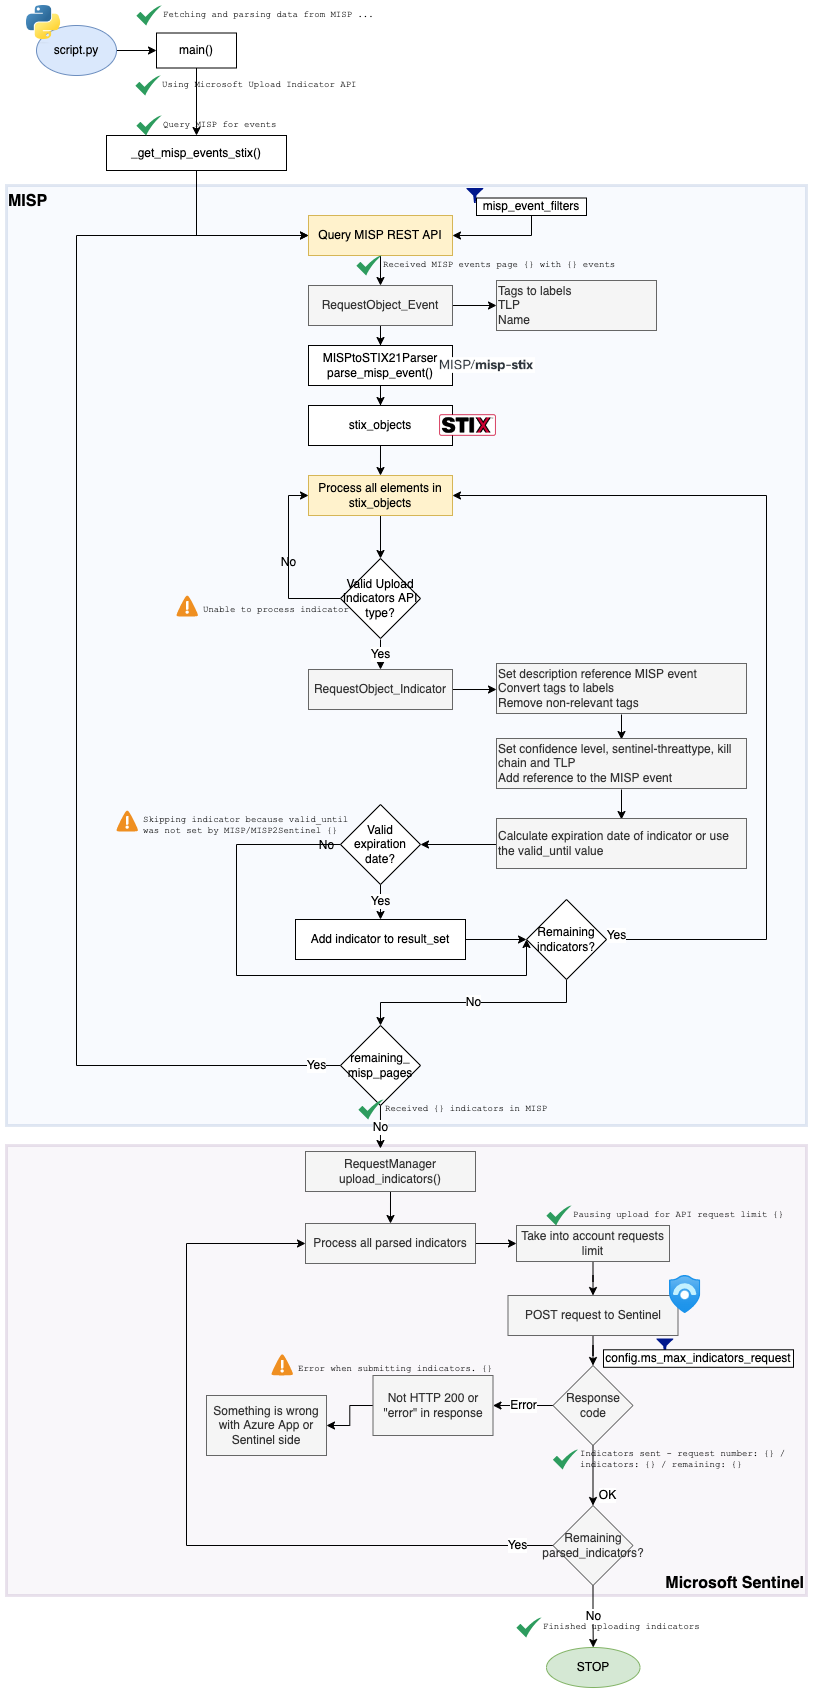 Image showing workflow courtesy of Koen Van Impe.
The second thing we need to know is that how we implement our filter will vary a lot depending on a few factors with how you manage MISP being the primary factor. For brevity I’ve split the different management methods into two categories:
- Managed MISP: MISP is managed either by a dedicated team using a process for event creation. Typically this kind of instance will both pull and push from other MISP instances.
- Unmanaged MISP: This is what we might refer to as an feed MISP instance (or IOC hub). This kind of instance is typically used to pull data from other MISP instances and feeds, and might not have any event creation process.
Default MISP2Sentinel filters
The default config.py file contains the following example filter:
misp_event_filters = {
    "published": 1,
    "tags": [ "workflow:state=\"complete\""],
    "enforceWarninglist": True,
    "includeEventTags": True,
    "publish_timestamp": "14d",
}
These are common options, so let’s go through them one by one.
published
| Name | Description | Example |
|---|---|---|
published (Optional[bool]) |
Set whether published or unpublished events should be returned. Do not set the parameter if you want both. | "published": 1 |
This parameter represents the event publication state. If the event was published, the published value MUST be true. In any other publication state, the published value MUST be false. This parameter is present in all events. This is an optional value.
tags
| Name | Description | Example |
|---|---|---|
tags (Optional[TypeVar(SearchParameterTypes, str, List[Union[str, int]], Dict[str, Union[str, int]])]) |
Tags to search or to exclude. You can pass a list, or the output of build_complex_query | Include all events with the tag workflow:state set to complete - "tags": [ "workflow:state=\"complete\""]Include TLP:Green and exclude TLP:Red - "tags": ["!TLP:RED","TLP:GREEN"] |
This parameter is used to search for events with a specific tag. You can pass a list of tags. This is an optional value, but a very strong filter to use. According to the MISP Best Practices, tagging with TLP-levels is a minimum for events.
If we want to filter out events with a certain tag, we can use the !-operator. This is useful if we want to filter out events with a certain TLP-level, like TLP:RED or TLP:AMBER+STRICT.
enforceWarninglist
| Name | Description | Example |
|---|---|---|
enforce_warninglist (Optional[bool]) |
Remove any attributes from the result that would cause a hit on a warninglist entry. | "enforceWarninglist": True |
This is basically as false positive filter, which will remove a lot of common IPs (like those belonging to Cloud Providers) from the results. This is an optional value.
includeEventTags
| Name | Description | Example |
|---|---|---|
include_event_tags (Optional[bool]) |
Include the event level tags in each of the attributes. | "includeEventTags": True |
Optional value that will include the event tags in the attributes.
publish_timestamp
| Name | Description | Example |
|---|---|---|
publish_timestamp (Union[datetime, date, int, str, float, None, Tuple[Union[datetime, date, int, str, float, None], Union[datetime, date, int, str, float, None]]]) |
Restrict the results by the last publish timestamp (newer than). | "publish_timestamp": "14d" |
This is a very useful filter, as it allows you to only pull events that have been published in the last X days. This is an optional value.
Some honorable mentions
to_ids
| Name | Description | Example |
|---|---|---|
to_ids (Union[TypeVar(ToIDSType, str, int, bool), List[TypeVar(ToIDSType, str, int, bool)], None]) |
By default all attributes are returned that match the other filter parameters, regardless of their to_ids setting. To restrict the returned data set to to_ids only attributes set this parameter to 1. 0 for the ones with to_ids set to False. | "to_ids": 1 |
Attributes in MISP have a boolean flag to_ids allowing you to indicate if an attribute should be used for detection or correlation actions. According to the MISP core format data standard, the to_ids flag represents whether the attribute is meant to be actionable. https://www.vanimpe.eu/2019/09/24/tracking-false-positives-and-disabling-to_ids-in-misp/.
type_attribute
| Name | Description | Example |
|---|---|---|
type_attribute (Optional[TypeVar(SearchParameterTypes, str, List[Union[str, int]], Dict[str, Union[str, int]])]) |
The attribute type, any valid MISP attribute type is accepted. | "type_attribute": "ip-src" |
You can see all the possible attribute types in the MISP OpenAPI spec. If we only wanted to include IP addresses, we could use this filter to only include attributes of type ip-src and ip-dst. We could also filter out unwanted types, like domain or hostname.
Putting it all together
Managed MISP
You will most likely end up with a filter very close to the default config.py when using a managed MISP, the only thing that might differ are what TLP-levels you’ll send to other organizations and how you manage your event creation process, which will return in a slightly different filter.
TLP-levels
If we use TLP-levels, we can use the tags parameter to include only events that have a TLP-level that we want to return. Two scenarios here are as follows:
- You are pushing to your own Microsoft Sentinel, in this case we don’t need to filter for TLP as we can include all.
- You are pushing to a another Microsoft Sentinel, in this case we need to filter out events with
TLP:REDandTLP:AMBER+STRICTas we don’t want to share those outside our organization.
If you’re wondering what TLP-levels are, TLP is short for Traffic Light Protocol and we currently have 5 levels.
TLP:RED

Not for disclosure, restricted to participants only.
TLP:AMBER+STRICT

Limited disclosure, restricted to participants’ organization.
TLP:AMBER

Limited disclosure, restricted to participants’ organization and its clients (see Terminology Definitions).
TLP:GREEN

Limited disclosure, restricted to the community.
TLP:CLEAR
![]()
Disclosure is not limited.
This TLP was formerly known as TLP:WHITE.
Microsoft Graph API uses TLP:WHITE instead of TLP:CLEAR, so when trying to sync events with TLP:CLEAR you might get an error.
Workflow based tags
For a managed MISP, we’ll need to look at the way we manage events. If we have a process for event creation, then we can use the tags parameter to filter on the event tags we use for our process. Common tags here are the workflow-ones, and we can chose (like the default config.py) to only include ones that have completed. If we use another tag for our process, we can use that instead.
As an example we can look to the default config.py.
Published events
Another common filter is to only include published events. If your process includes publishing reviewed event, then this is a good filter to implement. If you don’t have a process for publishing events, then you can leave this out.
As an example we can look to the default config.py again.
Umanaged MISP
This deployment type of MISP usually consumes a lot of feeds. Your strategy will vary solely on the percieved quality of the feeds you are consuming. If you are consuming feeds from a trusted source, then you might not need to filter at all.
On feeds
I will not be recommending a certain set of feeds, but the following can be done to minimize false positives and “bad” feeds:
- Use the
enforceWarninglistparameter to remove IPs belonging to cloud providers. - Use the
publish_timestampparameter to only include events that have been published in the last X days. - When enabling feeds, do your due dilligence in terms of checking the organization that is providing it.
- Do not enable low fidelity feeds just because they are free.
- Focus on feeds that are relevant to your organization.
- Map out organizations such as FIRST, your national CERT or other organizations that might allow you to pull/sync from their MISP instances and work on gaining access to those.
Some examples
A quick note on publish_timestamp; depending on how often the misp2sentinel-sync runs, you can change the value to shorten the amount of indicators pulled and thus shorten the runtime of the process.
Unmanaged MISP with high quality feeds to your own Sentinel
Basic filter that allows you to pull all indicators from your MISP instance to your own Sentinel, bar the false positives.
misp_event_filters = {
    "enforceWarninglist": True,
    "includeEventTags": True,
    "publish_timestamp": "14d"
}
Unmanaged MISP with high quality feeds to another Sentinel
Same as above, but we filter out all TLP-levels that we don’t want to share.
misp_event_filters = {
    "tags": ["!TLP:RED","!TLP:AMBER+STRICT"],
    "enforceWarninglist": True,
    "includeEventTags": True,
    "publish_timestamp": "14d"
}
Closing remarks
There isn’t a one size fits all solution for this, and the two methods for operating MISP only covers the two extremes. Most organizations will fall somewhere in between, and you’ll have to figure out what works best for you.
Until next time, happy hunting!
Previous writing on MISP
- Use Update Indicators API to push Threat Intelligence from MISP to Microsoft Sentinel
- Pushing Threat Intelligence from MISP to Microsoft Sentinel
- Increasing the default timeout of Azure Functions